← Fack to SUCS
The Documentation On How To Make Online Maps
Making your own maps is "kind of" "simple". Hopefully this guide will show you how to do it correctly.
What You'll Need
Optional Tools
Making a Map
Step 1: Opening Unity
Step 2: Actually Making the Map
Step 3: In-Game Tags
Step 4: Preparing the AssetBundle
What You'll Need
All you need is a copy of the Unity Editor. You must use either the version 2022.3.6f1 for the newest version of the game (1.2.1) or 2020.3.25f1 for older versions of the game. This shouldn't be too hard as Unity is only around ~5 GB. Plus, Unity is an amazing tool.
Optional Tools
- Blender
- Audacity (if you'll want to add sounds)
- Some kind of texture editor
- IMPORTANT: You may want to use the assets that are already inside the game. You can download them here (SucsAssetsPack.zip). Some of the prefabs and materials might not work properly so whoops.
Making a map
With this tutorial we're going to show you how to make a map in SUCS. One thing that you should know is that you can add ANYTHING to your map -- Objects, models, fonts, images, materials, terrain, UI -- you can add absolutely ANYTHING... EXCEPT for code. For whatever reason, AssetBundles (which are going to be our map files) do not support C# code. So unless you come up with some wizardry to get it working, C# will not work.
With that out of the way, let's find out how to make a map.
Step 1: Opening Unity
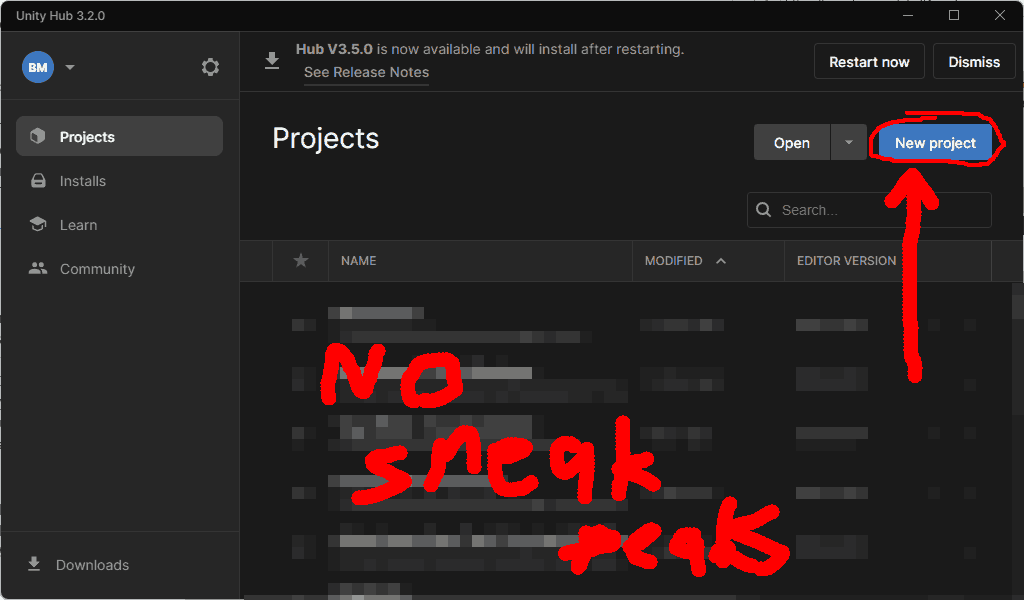
The first step, of course, is opening Unity. You will preferably want to create a new Unity project through pressing the big blue "New Project" button in the Unity Hub. But since this also can take up a lot of space, you can build your map on an existing project if you want to. MAKE SURE you make/use a 3D project, because obviously 2D will not work.
IMPORTANT: If you want to do ANYTHING with tags (like setting spawn locations), your tags need to be added the EXACT same way as they are in the image below:
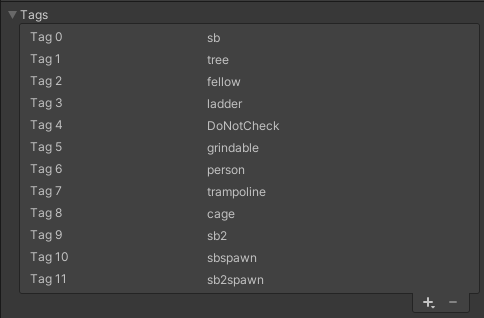
Yes, your tags need to be in this exact order (from Tag 0): sb, tree, fellow, ladder, DoNotCheck, grindable, person, trampoline, cage, sb2, sbspawn, sb2spawn. This is because Unity just checks the integer attached to a tag across Scenes instead of checking for the tag itself. Sigh.
Step 2: Actually Making The Map
The next step is making the map. You can do this in the SampleScene that Unity drops you in by default when you make a new project, or you can make a new scene by right clicking on the Assets folder and navigating to Create > Scene.
If you don't actually know how to add objects to a scene, let this be a general guide:
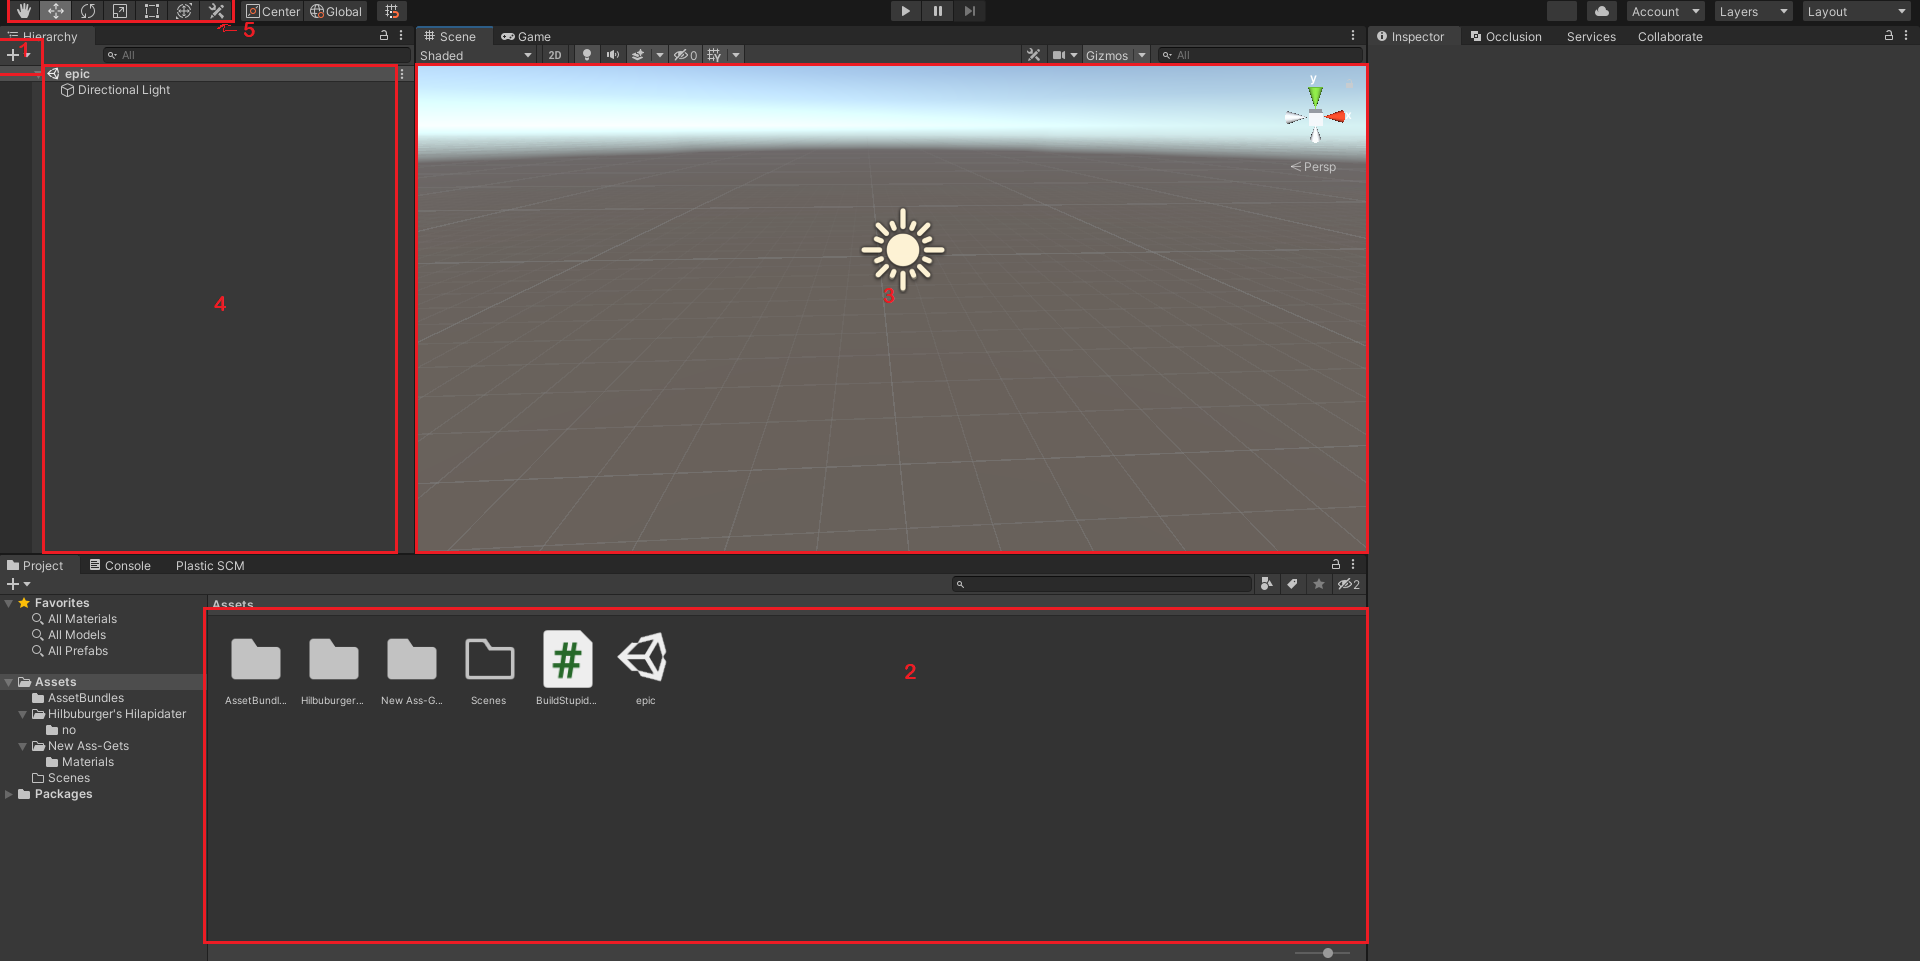
- This button will let you add basic GameObjects to your scene. Clicking here and then hovering over the "3D Objects" bar will let you add basic 3D Objects to your scene, like cubes and spheres.
- This panel is where your assets go, like models, images and materials. You can import these assets by drag-n-dropping them into the panel. You can then drag these assets into the certain places they need to go -- for example, you can drag models from the Assets tab into the Scene viewport to have your model in-game.
- Your scene viewport. This will show you all your objects in the 3D perspective. You can right-click + use QWEASD to navigate around your scene.
- Your heirarchy. In Unity you can parent objects into other objects -- this is known as a hierarchy. You can view the entirety of the hierarchy here and shuffle stuff around as you wish.
- This is your toolbox? Not sure what its actual name is, but that's what I'll call it. You can use the QWERTY keys to choose options from this toolbox. The options in the toolbox (from left to right) are: 1. Panning around the scene, 2. Transforming/Moving gameobjects, 3. Rotating gameobjects, 4. Scaling gameobjects, 5. Using a box as a guide for moving, rotating, and scaling gameobjects, and 6. Editing components (As far as I'm aware).
If you really don't know how to do something scene or object-related in the Unity editor, you can most likely look it up online... Unity Forums have thousands of answers for stuff like this. Google is your friend here.
Step 3: The In-Game Tags
The tags are incredibly helpful when it comes to game interactivity. It provides functionality to certain types of objects that need to communicate with the skateboardmovement/other scripts.
sb
The SB tag should ONLY be used by the Skateboard/Main Player gameobject. Using this tag with ANYTHING will make your map completely broken. DO NOT USE THIS TAG.
tree
This tag used to be used for the TerrainTree objects but has no use anymore.
fellow
Used to signify fellow skatesboardsman, but does nothing now.
ladder
This tag can make anything into a ladder. When the player is currently colliding with a gameobject with this tag, they will start to move up when the W key is pressed.
DoNotCheck
Excludes an object from awarding points due to the "Landed on" score reason. Should be used with terrain or meshes that take up a large part of the world so that the player is not rewarded for landing on them.
grindable
Lets an object become grindable by pressing "2" near it. This can be very finicky and works best with cube objects.
person
Is used for people in the game world and rewards points upon touching for "obliterating a stranger".
trampoline
Bouncy!
cage
Gives the "YOU FREED HIM" score... to my knowledge.
sb2
The SB2 tag should ONLY be used by the Player 2 gameobject. Using this tag with ANYTHING will make multiplayer broken. DO NOT USE THIS TAG.
sbspawn, sb2spawn
The sbspawn tag designates the spawnpoint for Player 1, while sb2spawn designates the spawnpoint for Player 2. You can probably imagine why these would be useful.
Some special objects are not read by tag, but by name. These include:
If any part of the name contains "skateboard"
This will designate the gameobject as a fellow skatesboardsman and will deduct points upon collision for "crashing into one of your fellow skatesboardsman".
TOILET
Designates it as a toilet and does the shitstorm thing.
Step 4: Preparing the assetbundle
IMPORTANT: Before you do this step, make sure that you DO have a Directional Light in your Scene, but that you do NOT have a MainCamera, or else GOD WILL HAUNT YOU FOREVER!! (Satan will also come into your room if any of the gameobject tags are sb or sb2 
Once you have built the entirety of your map and are content with it, you will want to start preparing your assetbundle. This is the hardest part because it involves [gasp] A SCRIPT!!! Don't worry though, it's a very short one. Download the C# Script below and drag/import it somewhere in your Assets folder:
BuildAssetBundle.cs
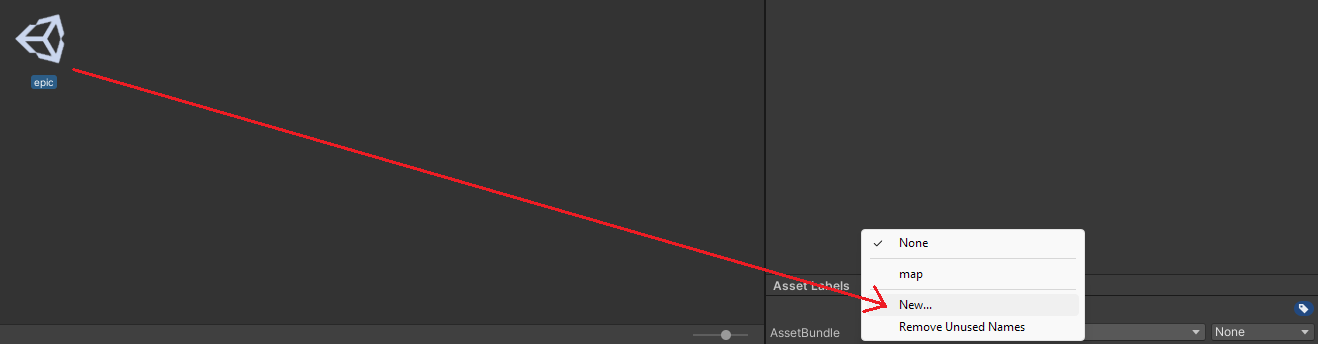
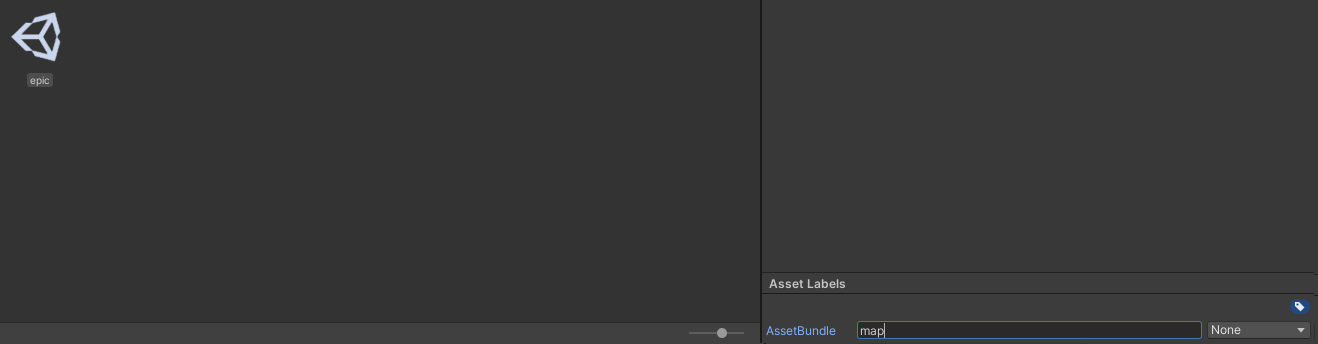
If you imported it correctly, a new option should appear when you right-click on a file in the Assets folder that says "Build Asset Bundle". Don't go clicking on this just yet. First, click on the Scene that you wish to turn into a SUCS map and navigate to the bottom of the "Inspector" tab, changing the AssetBundle property to the AssetBundle name "map". The AssetBundle name MUST be map, it cannot be anything else.
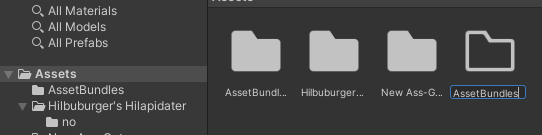
Then, go to the root Assets folder and make a new folder named "AssetBundles".
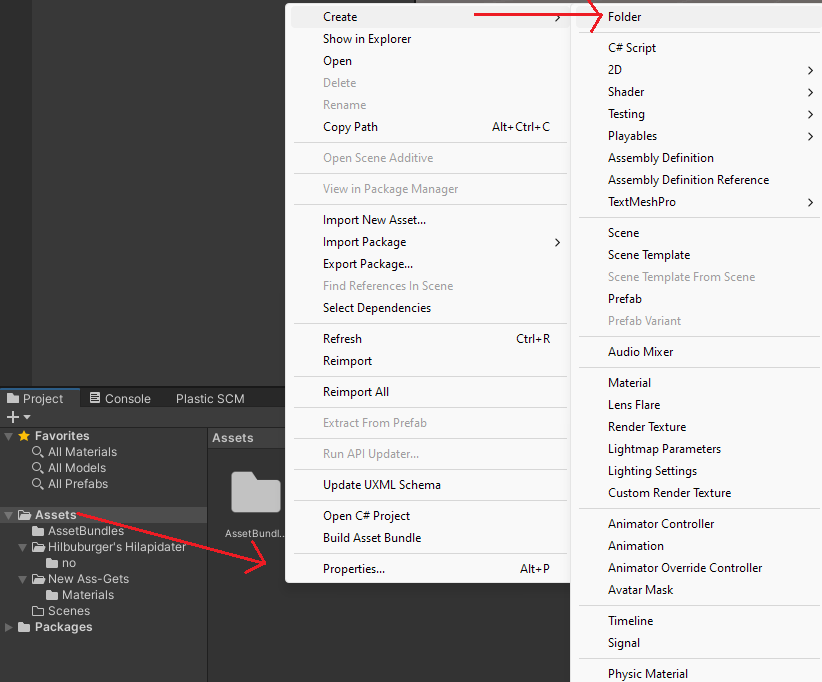
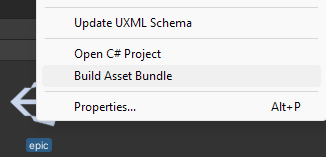
Now you must right-click on the Scene and click "Build Asset Bundle."
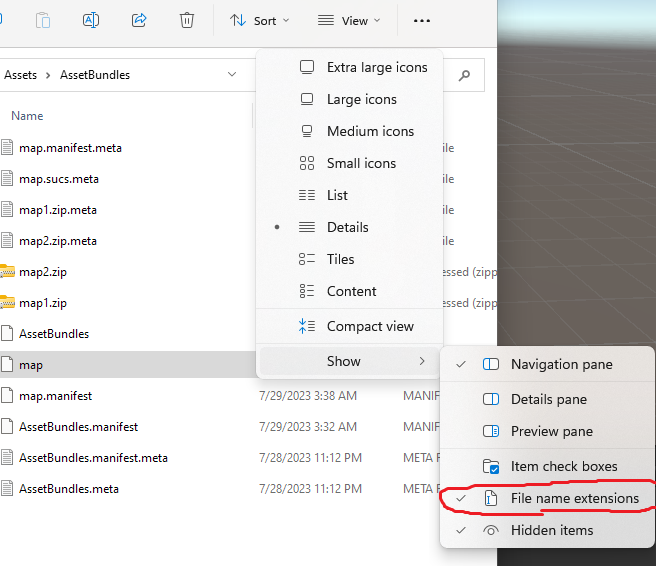
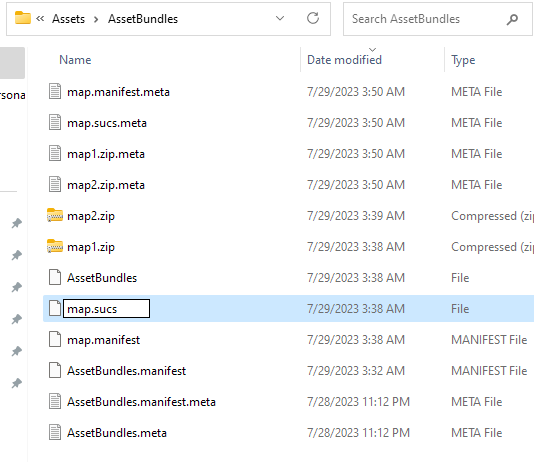
This should make a new file in the AssetBundles folder, a file called "map" with no extension. This is perfect. Right-click the AssetBundles folder and click "Show in Explorer". This should pull up the directory, where you will see your map file. You must rename this file to "map.sucs" (Make sure you have "File name extensions" on.)
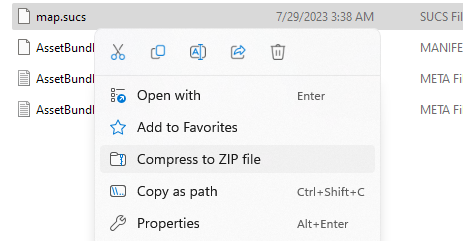
Now you have to compress it to a ZIP file.
And you're done! You can now test your map by extracting it to the directory "C:\Users\<username>\AppData\LocalLow\Triopulse\Skateboard-U-Cool Simulator\Maps\<folder name>" and running that through the game, or if you have confidence enough that it works, upload the URL to the game server. Important: Discord used to be recommended to upload map URLs, but this is no longer preferable as Discord now deletes files 4 hours after uploading. I recommend using either Mediafire, Dropbox, or Archive.org to upload zip files for free. Have fun with your map creation ventures.